MDWeb Running Simulation Tutorial
MDWeb provides a friendly environment to setup new systems and run test simulations. With this short tutorial, you will be able to run a Molecular Dynamics Simulation in your own machines, using files provided by MDWeb after preparing the system.
- Generating needed files
- Downloading and Extracting Files
- Preparing Downloaded Files
- Launching Molecular Dynamics Simulation
Tutorial Steps
- Generating needed files
- Downloading and Extracting Files
- Preparing Downloaded Files
- Launching Molecular Dynamics Simulation
This short tutorial assumes that user have already setup a system using one of MDWeb Workflows to run a complete system preparation: GromacsWorkflowFULL, AmberWorkflowFULL, or NamdWorkflowFULL (see Setup Tutorial ), or alternatively it has been prepared step by step using the appropiate MDWeb operations.
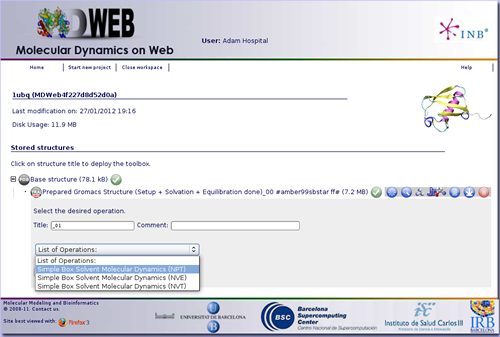
The first thing to do then is run an operation called Simple Box Solvent Molecular Dynamics with the MD ensemble of interest (NPT, NVE or NVT). It can be found in the MDWeb Simulation Operations, clicking at the icon ![]() .
.
We will need to fill in the parameter fields with desired values. For example, if what we want is to run a Molecular Dynamics Simulation of 10 ns with a timestep of 2 fs at a 300 K of temperature (a standard molecular dynamics first step, to completelly equilibrate the system), we just have to write these numbers: Time Step: 2 fs, Temperature: 300 K, Total Time: 10000 ps, and Output Frequency: 500 steps. Note that for choosing the output frequency, the total number of snapshots that will be written by the MD Simulation are computed on the fly and shown in red color. In this case, we have chosen to write every 500 steps in order to have 10000 snapshots, one per picosecond.
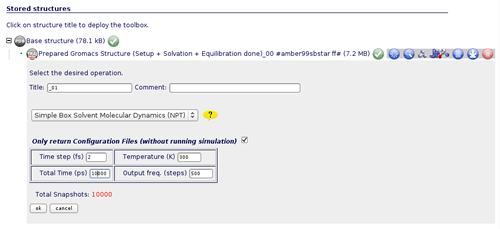
Note the line saying: Only return Configuration Files (without running simulation). Leaving this checked MDWeb will give you all the necessary input files to run the simulation, together with a README file with instructions about how to run it. Unchecking this line, MDWeb will perform the simulation, however, in the present case you will get an error message, because only simulations up to 500 ps are allowed in our server due to the limitations in computer resources.
Now, in the last operation results, we have to click at the download icon ![]() to get all the necessary files to run the prejected Simulation. The file downloaded is a gzip-compressed tar file, which can be easily uncompressed and unpacked with a teh appropriate program.
to get all the necessary files to run the prejected Simulation. The file downloaded is a gzip-compressed tar file, which can be easily uncompressed and unpacked with a teh appropriate program.
The list of files extracted, depending on the Workflow Program, looks like this (click to expand):
GROMACS Files
| File Extension | File information |
| pdb | MD Input coordinate file in PDB format. |
| gro | MD Input coordinate file in GRO format. |
| top | MD Input structure topology. |
| itp | MD Input include topology files. |
| ndx | MD Input index file, containing user definable sets of atoms. |
| trr | MD Input restart file, storing periodic box information, velocities and positions of all atoms. |
| edr | MD Input restart energy file, storing energies, temperature, pressure, box size, density and virials. |
| mdp | GROMACS Input configuration file. |
| gromacs | README.gromacs, explaining how to run the simulation. |
| tpr | MD Run Input File, in binary format, containing the starting structure of your simulation (coordinates and velocities), the molecular topology and all the simulation parameters. |
| sh | queueSP* --> C-shell script to run MD simulation on a single processor. |
| queueMPI* --> C-shell script to run MD simulation on multiple processors with MPI. | |
| queueSGE* --> C-shell script to run MD simulation on a queue manager (SGE). |
NAMD Files
| File Extension | File information |
| pdb | MD Input coordinate file in PDB format. |
| psf | MD Input structure topology. |
| xsc | MD Input eXtended System Configuration. |
| pos | MD Input structure positions. |
| vel | MD Input structure velocities. |
| in | NAMD Input configuration file. |
| namd | README.namd file, explaining how to run the simulation. |
| sh | queueSP* --> C-shell script to run MD simulation on a single processor. |
| queueMPI* --> C-shell script to run MD simulation on multiple processors with MPI. | |
| queueSGE* --> C-shell script to run MD simulation on a queue manager (SGE). |
| File Extension | File information |
| pdb | MD Input coordinate file in PDB format. |
| top | MD Input structure topology (PRMtop format). |
| in | AMBER Input configuration file. |
| amber | README.amber file, explaining how to run the simulation. |
| sh | queueSP* --> C-shell script to run MD simulation on a single processor. |
| queueMPI* --> C-shell script to run MD simulation on multiple processors with MPI. |
First of all, let's take a look at the README file. In one section, it is said that a few lines of the shell scripts queue* need to be modified before launching the simulation. They refer to MD program paths and libraries. These are enclosed between these marks:
##############################################################
#
# Modify the following lines according to your installation
#
--> Lines to modify <--
###############################################################
So we are going to edit the file named queueSP*, that corresponds to a single processor run. The same should be done with the corresponding queueMPI* file to launch the simulation in Multiple Processors or with queueSGE* to use SGE queue manager.
##############################################################
#
# Modify the following lines according to your installation
#
# Path to GROMACS
set GROMACS=/usr
# GROMACS mdrun binary, uncomment as necessary
set MDRUN=$GROMACS/bin/mdrun
#set MDRUN=$GROMACS/bin/mdrun_mpi
#set MDRUN=$GROMACS/bin/mdrun_d
# GROMACS trajconv executable, uncomment as necessary
set TCONV=$GROMACS/bin/trjconv
#set TCONV=$GROMACS/bin/trjconv_d
###############################################################
In our case, we know that our Gromacs mdrun executable is located at /opt/gromacs/bin/, so we just need to modify the Path to GROMACS variable:.
set GROMACS=/usr
set GROMACS=/opt/gromacs
set TCONV=$GROMACS/bin/trjconv
Once again, a section of the README file can help us in this task. It is said that if executing in Single Processor mode, we just need to type:
csh queueSP* & where queueSP* can be replaced by the complete real name of the csh file.
And if all was fine, you will be able to follow the progress of your simulation from the output file named *_mdrun.log, where information about the completed and remaining steps is written, together with an estimation of the finishing time:
starting mdrun 'Protein in water'
5000000 steps, 10000.0 ps.
step 0
NOTE: Turning on dynamic load balancing
vol 0.80 imb F 2% step 100, will finish Tue Oct 18 11:20:51 2011
vol 0.81 imb F 1% step 200, will finish Tue Oct 18 11:49:35 2011
vol 0.80 imb F 1% step 300, will finish Tue Oct 18 07:22:22 2011
vol 0.80 imb F 0% step 400, will finish Tue Oct 18 05:08:26 2011
...
For launching simulations with other packages (AMBER and NAMD), the steps of this short tutorial should be completely equivalent.