MDWeb Setup Tutorial
MDWeb provides a friendly environment to setup new systems and run test simulations. With this short tutorial, you will be able to prepare a molecule to run a molecular dynamics simulation, following just a few steps.
- Registration
- Starting Project
- Checking the Structure
- Structure Setup
- Waiting Results
- Getting Results
Tutorial Steps
- Registration
- Starting Project
- Checking the Structure
- Structure Setup
- Waiting Results
- Getting Results
The first thing to do is choose between working as an anonymous user or alternatively as a registered user. We strongly recommend working as a registered user, as it has some important advantages.
Anonymous user's projects are completely removed once the user is disconnected and also when session expires (after some minutes of inactivity), and therefore working as anonymous user is only suited for a first impression of the web server.
Registration process will just take a minute --> Registration.
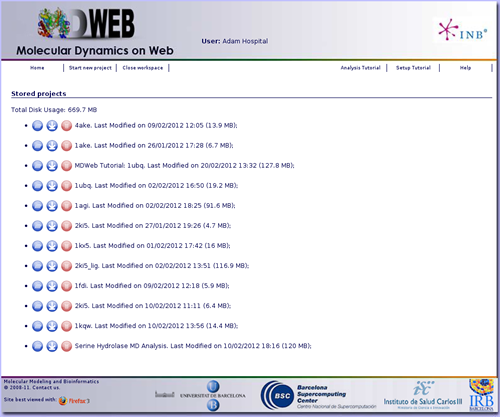
Once logged in, the user workspace appears. In this workspace, all projects of the user will be shown.
Now, we are ready to start our first MDWeb project.

MDWeb user can choose between two different kind of inputs, Simulation and Analysis. In this tutorial, we will see an example of a Setup (Simulation) project.
You will be asked for just three easy inputs: a project title, an optional description of the project, and an input structure, either as a PDB code or directly as a PDB structure file.

Just after creating the project, you will be redirected to the so-called Checking page. In this page, MDWeb will show a list of possible problems found in the input structure that can affect to a future Molecular Dynamics Simulation. User can interactively inspect these problems thanks to a JMol applet coupled to each of the problems, helping to locate them on the real tridimensional structure.
In this particular case, we are trying to work with the well-known Ubiquitin chromosomal protein (pdb code 1ubq). At the right part of the screen, you will find all the possible problems identified, whereas at the left part of the screen the JMol applet with the structure loaded will be shown.
This small protein, with less than 80 aminoacids, has just two possible problems, marked as a warning symbol ![]() or as an error symbol
or as an error symbol ![]() in the problem list.
in the problem list.
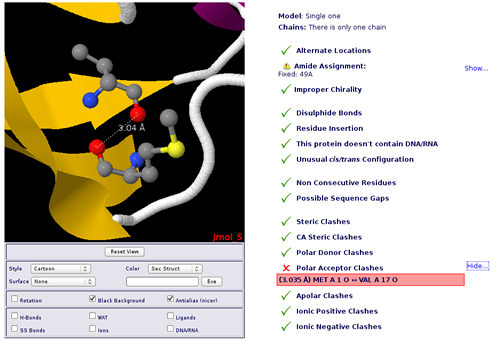
Warning messages are identified problems that can sometimes be adjusted/corrected in this same page. For example in this case there is an amide incorrect assignment in the residue number 49, that can be fixed with just a click in the desired button. The identification of this type of problems (together with all the possible problems checked) is described in the correspondent help section (Structure Checking).
Error messages are identified problems that will probably cause Molecular Dynamics failure. The typical example is the one found in our example protein, an atom clash. Our ubiquitin protein has a pair of Polar Acceptor atoms too close (two oxygen atoms specifically, as you can perfectly see in the JMol applet), just 3Å away. In this case, a simple energetic minimization of the system will put these pair of oxygen appart from each other, but sometimes a clash like this can be extremely dangerous for a Molecular Dynamics Simulation. Atomic clashes and Sequence Gaps are two of the most relevant problems in running MD simulations. More information about them can be found in the correspondent help section (Structure Checking).
Note that in this example, a Polar Donor Clash appears when we first load the structure, but it disappears when user fixes the incorrect amide assignment and the clashes are recomputed.
When clicking the next button, an intermediate information page will appear, listing the most important information chosen in the previous Checking page, i.e. amide assignments and ligands discarted/taken, and showing the part of the structure (chain/s) chosen for the project in a JMol applet.
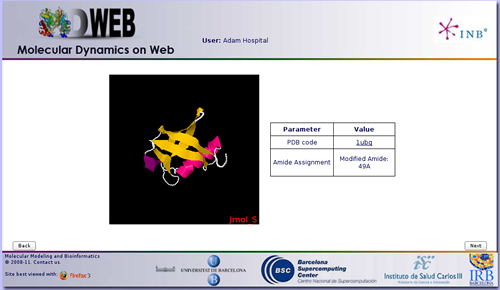
In this particular case, we just did a modification in one amide, on the residue 49.
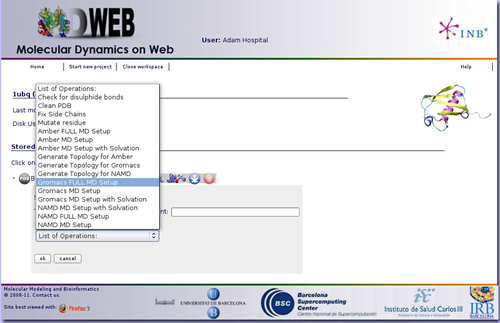
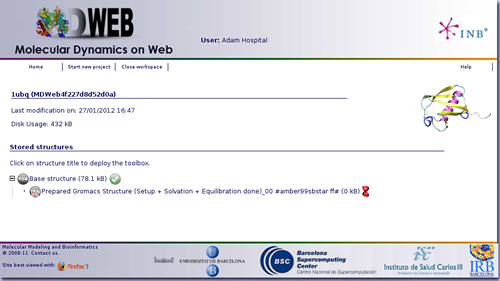
At this point, we already have our structure loaded into MDWeb workspace. Now we are going to choose a workflow from the list of possible operations, after clicking at the New Operation icon ![]() . Our goal is obtain a system completely prepared to begin a Molecular Dynamic Simulation with Gromacs package. So we will click at the operation named: Gromacs FULL MD Setup. Note that choosing operation Namd FULL MD Setup, a system for Namd Package with Charmm forcefield will be prepared, and choosing Amber FULL MD Setup, a system for Amber Package with Amber forcefields will be prepared.
. Our goal is obtain a system completely prepared to begin a Molecular Dynamic Simulation with Gromacs package. So we will click at the operation named: Gromacs FULL MD Setup. Note that choosing operation Namd FULL MD Setup, a system for Namd Package with Charmm forcefield will be prepared, and choosing Amber FULL MD Setup, a system for Amber Package with Amber forcefields will be prepared.
Gromacs FULL MD Setup will run a complete Molecular Dynamics Setup to the input structure. That means going from a protein/nucleic acid structure to a system formed by the molecule submerged into a solvent box, surrounded by ions up to a given concentration, and energetically equilibrated. For a more extended information about the steps done by the workflow, see the corresponding help section (Gromacs Workflow FULL Setup).
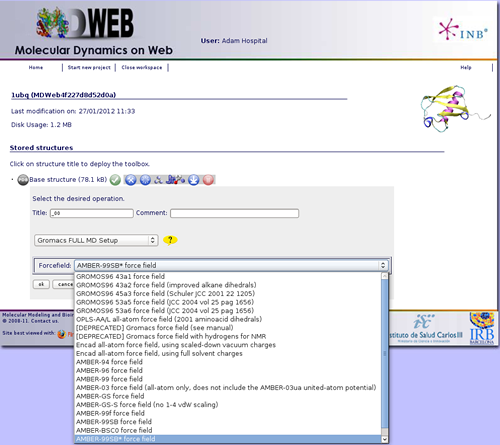
After clicking at the workflow Gromacs FULL MD Setup, it will give us the possibility to choose between a set of different forcefields. A force field has three components: equations defining the potential energy of a molecular system as a function of atomic coordinates, atom types, and parameter sets that fit the equations to experimental data. We will just keep the option that is active by default in MDWeb. In this case, Amber-99SB* forcefield.
Once the workflow is launched, we just have to wait for the results. MDWeb will be automatically reloaded from time to time after checking if the process has already finished. Meanwhile, you can follow the progress of it clicking at the sandclock ![]() whenever you want.
whenever you want.
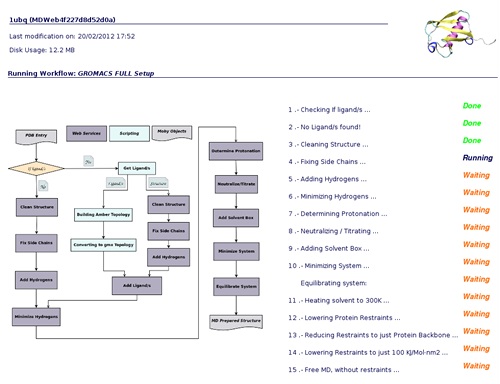
When clicking at the sandclock ![]() , a new page will be opened showing the progress of the workflow step by step, accompanied by a figure of the whole workflow. This way, you will be able to know at any moment which service is being executed, how many steps have been already computed, and how many steps left.
, a new page will be opened showing the progress of the workflow step by step, accompanied by a figure of the whole workflow. This way, you will be able to know at any moment which service is being executed, how many steps have been already computed, and how many steps left.
MDWeb offers you the possibility to leave your processes running (as sometimes they will be long processes), disconnect from the server, and reconnect again later on, to check the progress of your projects. The list of projects is easily accessible from the user workspace page.
Once the workflow has finished, you have the possibility to download the data generated, just clicking at the download icon ![]() .
.
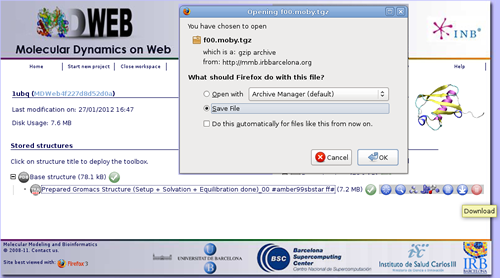
Now you can work with your system, already prepared to run an MD Simulation with Gromacs package. The downloaded compressed file has all the necessary inputs to run the simulation, but still you will need to prepare the configuration file needed by gromacs to begin the run with some key parameters like the MD ensemble, simulation time, time step, etc. But don't worry, if you are not familiar at all with Gromacs, MDWeb will help you preparing these configuration input files for you. Check Run Simulation Tutorial.
This example is done with Gromacs package, but MDWeb also offers a complete setup workflow for working with Namd package with Charmm forcefield or Amber forcefields. The complete list of workflows can be found at help pages (MDWeb List of Workflows).